This is a step-by-step tutorial for creating hand-drawn hillshade with graphite (pencil). Visit here for my tutorial on hand-drawn hillshade with colored pencil — although, this graphite tutorial that you’re reading contains the first steps required for finishing with color.
A brief history of this tutorial
Back in 2018, I wrote a blog post on my method for hand-drawn hillshade. I also gave a workshop on this technique at the 2018 NACIS conference along with talented cartographer and watercolor artist, Molly O’Halloran. We called our workshop “C-ART-o Camp: Exploring Art Materials and Methods.” Molly shared her wisdom of creating maps with watercolor. It was a lot of fun to see the participants’ hillshades and watercolor maps. My 2018 blog post lived on a site called “Petrichor Studio” a geo-collaboration that I started with my good friend, Jacob Wasilkowski. I later posted this color tutorial for taking your graphite hand-drawn hillshade and adding color. My color hand-drawn shaded relief tutorial exists on this site that you’re on right now, sarahbellmaps(dot)com. Petrichor Studio no longer exists.
Many people have asked me where my hand-drawn hillshade tutorial lives now. If you’ve been wondering, first – thank you for your support and interest! It actually hasn’t been anywhere for quite a while now. I’ve always intended to post it here on SarahBellMaps, because this site will have longevity. After my friend and cartography faculty member at NSCC’s renowned Centre of Geographic Sciences (COGS), Martha Bostwick, recently inquired about the whereabouts of this pencil hillshade tutorial, I decided to finally repost it. Actually, I am rewriting it, since I do not have access to the original post. Enjoy! By the way, I cherish seeing everyone’s take drawing hillshade, so if you do execute some hillshades from this tutorial, please share!
Required Materials
The steps are coming up, but let’s start with the things you’ll need. If you’re someone who loves drawing enough to have visited your local art supplies store recently, you likely have some or all of these items already.
- Artist quality drawing paper and a sketch pad
- Artist quality graphite pencils (I prefer Faber-Castell 2B-6B)
- Blending stumps
- Good erasers (high polymer & kneaded)
- Reference photo (See below for Step 1, Choose a reference photo)
- A light box (if you’re tracing) – or a large monitor that you’re ok with using as a light box. This is what I usually do.
- Patience. This is such a wonderful journey. At the beginning of this journey, you’ll question if your drawing will ever begin to look like a respectable shaded relief. It will! But it won’t be instant. Drawing a single hillshade takes time. The end result is very rewarding — and the process can be as well, if you allow it to be. Drawing shaded relief can bring you into a flow state of mind. It’s worth it just for that! Here’s a little insider confession: There has been a moment during every hillshade that I’ve ever drawn when I’ve felt that it was never going to pan out. But I trusted my process, and eventually the map pops into something pleasing (to me, at least).
Step 1. Choose a reference photo
Making hllshade work means capturing the different ways that light plays along the surface – it’s easier to see this light in areas with a lot of contrast. For this reason, beginning with a larger scale (more zoomed in) area that interests you, that also happens to have a lot of topographic relief (steep terrain) can be a bit more straightforward than areas with subtle relief. This tutorial’s steps can be applied to small scale maps and areas without dramatic relief, but for a simpler introduction to this method you might want to begin with steeper terrain. If you don’t have an area in mind, I’ve created two digital hillshades that you can download here.


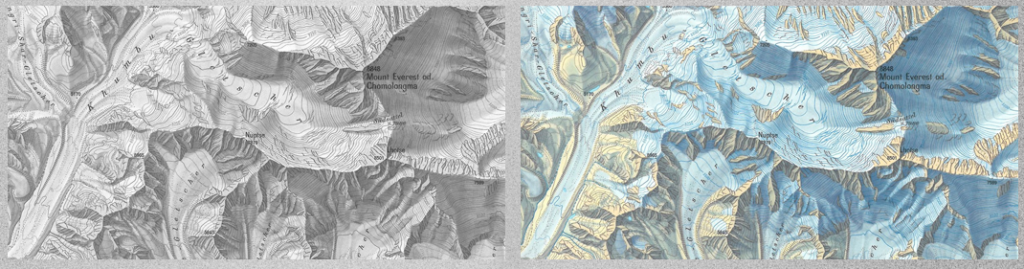
Pro tip: Desaturate your reference images
The illusion of hillshade is really just the difference between light and dark values on a page or a screen. For this reason, if you have a reference photo that is in color, desaturate the image in a program like Photoshop so the valuable grayscale is the main feature that catches your eye. Below are two versions of Eduard Imhoff’s Everest topo map with hillshade. The left has been desaturated, which makes picking out the differences between light and dark values easy.